Saturday, January 19, 2013

Minnie Mouse Nails Tutorial

Heyyyy! :) A little while ago, an email came into my inbox from Maya R requesting me to do Minnie Mouse nails like the ones on CutePolish! Well, here they are!
Totally adorable! These nails Minnnie Mouse nails are sooo simple and quick. Let's begin,

First, put a base coat on then ONE coat of light pink.
Next, paint the tips of your nails red.
Use a toothpick to create tiny white dots all within the red range.
Now, make a tiny bow on the corner of the red strip. To do this, make a small black dot and two petite triangles on both sides!
For my own personal twist, I added glitter to the red strip on the ring fingers, but that's optional. Add a top coat, clean up with nail polish remover, and you are done! Super quick, super cute, absolutely gorgeous!
I am open to more beautiful ideas, all you have to do is email me at fashionprincessglitter@gmail.com
 Now, I have a Facebok page for my blog! If you wanna check it out, click here. Please 'like' :) It means a lot!
That's all for today! Until next time,
Be bold, bright, and gorgeous!
Gabby

Saturday, January 12, 2013

Snake Braid Tutorial

Hey there! It's been a while since I last posted. I have a lot of cute new ideas in store and I also received an email with a fabulous idea, I jut need to have time to do it :) For right now, I thought I should share a tutorial on how to do a snake braid. This is a simple and gorgeous hair style that is super-duper quick. I did this a while ago under an old post but that's ok!

First, take a small section of hair and braid it.

Take two of the strands from the braid push them up while holding the middle one in place.

Slowly spread apart the area that was scrunched, but not all the way otherwise the braid will be undone.

Add a clip to secure the braid and viola! You have a totally adorable snake braid in your hair! It's best to use a clip instead of a hair tie. :)
There are more totally awesome and glamorous tutorials coming soon! Until next time,
Be bold, bright, and gorgeous!
Gabby

Saturday, December 22, 2012

Sock Bun Tutorial

Just as promised in my last post! I have a simple tutorial for a Sock Bun! This sweet hairstyle is super cute for the holidays! Not everyone has one of those round hair things called "Donuts" and I don't have one either. Why spend money on something you can make from scratch?
All you need is an old clean sock and a hair pin/clip to create one! The color doesn't matter that much (obviously since mine is pink) but neutrals would probably be a better choice. Darker haired gurlies don't have to worry about this as much.
First, take the edge of the sock that is sealed and put it into the open end.
 Now the sock should look like this:
To help prevent the sock from coming apart, secure the clip where the two ends of the sock meet.
There you have it! Your own costume donut! Now it's time for the hair style. For the best results, your air should be straight and the longer your hair, the better. The shortest your hair should be in this style is about three inches below your shoulders. Any shorter, the style will come apart before you can say "Sock!" Let's get started.
Put your hair into a HIGH ponytail.
Then, take the donut and put your hair through it. Leave it at the edge of the pony.
Now, roll your hair around the sock as if you are rolling up your sleeves.
Yeah, your hair is gonna look a bit crazy. Spread your  hair evenly around the sock so until it' concealed.

Your hair is probably gonna look better than mine but, you get the idea. If you have shorted hair for this hairstyle, like mine, out i some bobby-pins so the bun stays in place. You have to put them on the bottom of the bun onto your scalp otherwise it will look sloppy and small. It's really pretty, right?! Add a sparkly head band for some glamor and your done!

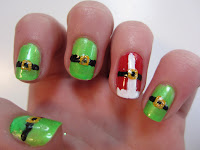
Now, for some gorgeous manicure ideas for the holidays! I did them throughout the month and they are perfect for the Holidays!

My inspiration for this mani is from Cute Polish.  She has awesome ideas!
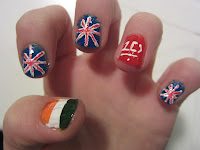
And this is a One Direction Mani I did on my BFF Emmy!
That's it for today! Happy Holidays to everyone! I'd like some ideas please! Email me at fashionprincessglitter@gmail.com Until next time,
Be bold, bright, and gorgeous!
Gabby

Friday, November 30, 2012

Quick Update!

Sorry it's been soooo long since I last posted! Just a quick update so you all know I'm still here! In the next post, hopefully I will give a tutorial on how to do a Sock Bun! Well, here is my Thanksgiving mani :)
 And my current one!
Well that's all for today! Until next time
Be bold, bright, and gorgeous!
Gabby

Sunday, November 11, 2012

Fire Manicure Nail Tutorial

Fire! Everyone knows not to play with it for boring safety reasons but, this manicure is feisty, bold, gorgeous, and safe! This manicure is simple, all you need is black and orange nail polish plus, darker orange and red nail art. A toothpick works just as well if you don't have nail art. Start with a nice base coat then place a coat of black nail polish.
Take your orange nail polish and make curved triangles facing in any direction. These will be your flames.
  Use your dark orange nail art and create mini triangles inside the flames. Some may connect to others but, don't let the darker orange touch the bottom or the nail.
Now grab your red nail art. Outline the inside of the flames so it looks like they are separated. The red also gives the fire a more warming and bright feel.
Finally, add your top coat, use nail polish remover to remove any nil polish on the skin and let dry. 
Hooray! There are glamorous fire on your nails! And the best part is, they don't burn :)  That's all for today! Until the next glamor filled time,
Be bold, bright, and gorgeous!
Gabby

Monday, October 29, 2012

Halloween Mani

Halloween is only two days away! I needed a cute nail design for this occasion! A little ghost possessed my mind and gave me a fabulous idea, it kinda looks like Frankenstein! Perfect since Frankenstorm is out there in the world...
It's pretty simple to do, base coat, use lime green for all fingers but the ring; use hot pink and use a toothpick to make the jagged lines! After, add top coat and BAM! Your haunted nails are complete. Just a little something different than the traditional candy corn mani :) The brighter the base color, the more haunted it looks. In my opinion, glow-in-the-dark nail polish would also be a super intense and gorgeous look! Happy Halloween everyone! Eat lots of candy!
Enjoy Trick or Treating!
Gabby

Sunday, October 21, 2012

Nyan Cat Eyeshadow Tutorial

It's time to have fun with make-up! In this tutorial, you will learn how to do Nyan Cat on your eye! This is a great thing to do especially since it's almost Halloween! A cute funny design for everyone to see :) You will need pink, light blue, gray, red, orange, yellow, green, dark blue, and purple eyeshadow, mascara and eyeliner.
First, place the light blue eyeshadow to cover your eyelid and a bit under you eyebrow, creating a diagonal line.
Next, use your eyeliner to create Nyan Cat. Make his head, color it gray, then make a rectangle beside that.  Add a tiny tail behind him and three mini legs below him, two below his head, and one near the edge of the rectangle.
Now, add the face. Place two small dots for eyes and a "w" shaped figure for its mouth.
Time to add color! In his body, put pink in. Then carefully dab blue and purple in the center of the rectangle. Make sure you can still see pink surrounding the sprinkles.
Rainbow time! Take your red and make a thick line going down half your face. Add the orange and yellow along side that, making sure both are visible. As for the darker colors of the rainbow, make them slightly thinner and not as dark so they contrast well with the lighter colors.
  Finally add eyeliner. Use the cat-eye style and then add mascara. YAY! We have Nyan Cat!
That's all for today! Enjoy your lovable Nyan Cat! Until next time,
Be bold, bright, and gorgeous!
Gabby

Total Pageviews