Tuesday, June 18, 2013

Glitter Ombre Nails

Hello! This post is a simple nail tutorial showing you how to create glitter ombre nails. The design is quick and easy.

First, start with a base coat. Then, put one base color on your nails. Be sure to do two coats! 
Next, you need to apply magic fairy glitter to make the ombre just appear and to add sparkle. Just kidding! Ha! Really had you fooled there! ;) Take glitter polish and make a stripe across the top of your nail. It must have lots of glitter in the stripe.
Wipe the brush by putting the excess polish back into the bottle so there is minimal polish on the brush. Gently place the brush on the stripe and pull the brush down your nail to about the halfway point. Continue this until all the glitter polish has been spread. More glitter should be at the top of your nail and should thin out. If you feel the glitter polish looks too even, use the glitter polish to make another stripe at the top of your nail like in the 2nd step.
Finally, put on a top coat and clean up any nail polish that got on your skin with nail polish remover. easy as 1-2-3!
These are simple yet chic nails that are perfect for any occasion. I did this mani to complement my dress for graduation!
More nail and hair tutorials will be coming soon! Until next time,
Be bold, bright, and gorgeous!
Gabby

Saturday, March 16, 2013

Argyle Nail Art Tutorial

Hey there! It's been far too long since I last posted! Please forgive me :)
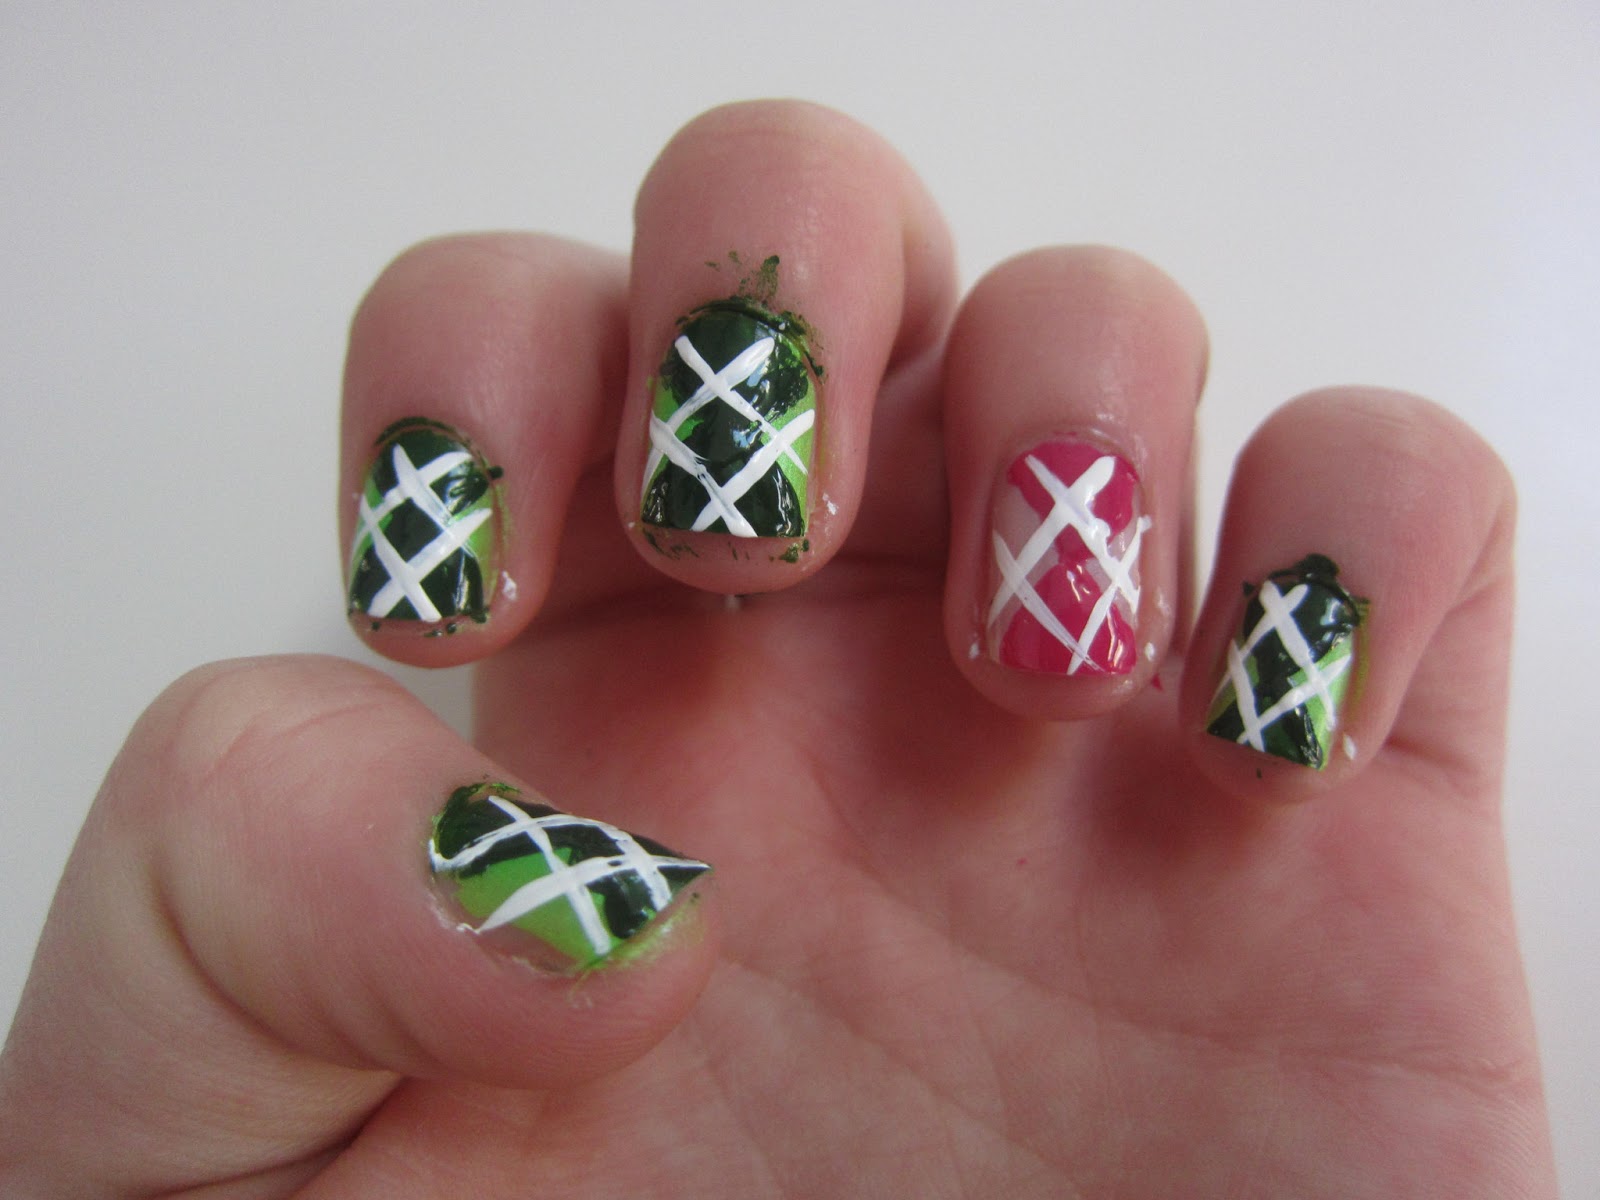
Today I will be sharing a Argyle Nail Art tutorial with you. The one and only CutePolish made this up! This is a bold print that is sure to get noticed! Take a look!
This pattern is simple to create. You need a base color and a color that's darker than your base. My colors are green and the accent nail is pink. Any colors can be used. And forgive my sideways pictures, my blog is quite mad at me ;)
First, apply a base coat and then your base color.
 Now create an "x" on each nail. Make sure you are using the darker color.
Fill in the top and bottom triangles with the darker color.
Next, take white nail art and create a small line on the top triangle, going diagonally. Start the line slightly off center.
Use the nail art again to t=do the same thing except in the opposite direction.
 Take the white nail art to mirror those steps on the bottom.
Repeat these steps until all the nails are covered. 
Finally, add the top coat and clean up messes with nail polish remover. There it is, the gorgeous design you have been waiting for! Enjoy!

That's all for today! Remember to check out my Facebook page here. "Likes" are greatly appreciated! Until the next time,
Be bold, bright, and gorgeous!
Gabby


Sunday, February 10, 2013

Penguin Nail Art Tutorial

These aren't any ordinary penguins, these penguins have bow ties!
Just too cute to resist!!!!! These penguin nails sure do make a statement! Well, let's get started!

First, put on a base coat then a solid coat of light blue.
Next, take white nail polish and create an arch in the center. Fill it in and be sure to leave some blue noticeable on  the sides and top.
Now, use a toothpick to create two small dots on each nail in the white range. These are the eyes.
Use another toothpick to make a a tiny orange triangle facing down between the two eyes.
Take the orange again to make two little dots at the edge of the nails for feet.
You could stop right here for the classic penguin look but, I enjoy going to the extreme! Take a light pink and make a dot in the center of the white. On the sides of each dot, make two larger ones, opposite sides from one another.
Finally, use a top coat and clean up any sloppiness with nail polish remover. Viola! Totally adorbs penguin with bow ties nails! 
Just look at the little face. Don't you just wanna melt!

That's all for today!  Please like my Facebook page here.
Until the next time,
Be bold, bright, and gorgeous!
Gabby

Saturday, February 2, 2013

Owl Nails Tutorial

Hello Fashionistas! Today, I'm gonna share this adorable tutorial on how to do owl nails! I just couldn't resist doing these :)
 
 Aren't they cute? Well, let's get started! 

First, use base coat then paint your nails a solid color and make an arch near the cuticle. 
Next, use a contrasting color for the stomach. It's just another arch facing the opposite direction.
Take a toothpick and use the color you used as a base coat to make tiny curved lines on the stomach.
For the eyes, make two yellow dots (big, but not too large) with some space between just above the owl's tummy.
Now, take a black and place a tiny dot in each eye.
Next, take an orange and make a mini triangle between the eyes. It should be slightly on the belly. This is the beak.

Finally, add the top coat and clean up any messes with nail polish remover.
Hooray! You now have an Oh-Too-Cute owl mani!
That's all for today! Remember, I'd love to hear some gorgeous ideas: email me at fashionprincessglitter@gmail.com
 Also, check out my Facebook page! If you wanna see it click here. Please like =)
Until the next time,
Be bold, bright, and gorgeous!
Gabby

Saturday, January 19, 2013

Minnie Mouse Nails Tutorial

Heyyyy! :) A little while ago, an email came into my inbox from Maya R requesting me to do Minnie Mouse nails like the ones on CutePolish! Well, here they are!
Totally adorable! These nails Minnnie Mouse nails are sooo simple and quick. Let's begin,

First, put a base coat on then ONE coat of light pink.
Next, paint the tips of your nails red.
Use a toothpick to create tiny white dots all within the red range.
Now, make a tiny bow on the corner of the red strip. To do this, make a small black dot and two petite triangles on both sides!
For my own personal twist, I added glitter to the red strip on the ring fingers, but that's optional. Add a top coat, clean up with nail polish remover, and you are done! Super quick, super cute, absolutely gorgeous!
I am open to more beautiful ideas, all you have to do is email me at fashionprincessglitter@gmail.com
 Now, I have a Facebok page for my blog! If you wanna check it out, click here. Please 'like' :) It means a lot!
That's all for today! Until next time,
Be bold, bright, and gorgeous!
Gabby

Saturday, January 12, 2013

Snake Braid Tutorial

Hey there! It's been a while since I last posted. I have a lot of cute new ideas in store and I also received an email with a fabulous idea, I jut need to have time to do it :) For right now, I thought I should share a tutorial on how to do a snake braid. This is a simple and gorgeous hair style that is super-duper quick. I did this a while ago under an old post but that's ok!

First, take a small section of hair and braid it.

Take two of the strands from the braid push them up while holding the middle one in place.

Slowly spread apart the area that was scrunched, but not all the way otherwise the braid will be undone.

Add a clip to secure the braid and viola! You have a totally adorable snake braid in your hair! It's best to use a clip instead of a hair tie. :)
There are more totally awesome and glamorous tutorials coming soon! Until next time,
Be bold, bright, and gorgeous!
Gabby

Total Pageviews